Dear lovely readers:
I promised that by Thursday I would post photos of my awesome creations from this past weekend. Unfortunately, this is the last week of school for students. Therefore, I have not had the time to get my camera working and to have Nate take pictures of anything. And I am unable to take pictures that are decent at all by myself with my camera phone.
I'll have this situation remedied as soon as I can.
Sincerely,
Sara
03 June 2010
Best Summer Beverage. Ever.
 cc photo from yosemitewu56's flickr stream
Well, at least until we break out the meyer limoncello. You shouldn't drink meyer limoncello first thing in the morning. Even if you are on summer break.
You should start your morning off every day this summer instead with a Greek frappe. Well, you should also have one in the middle of the morning and one in the afternoon. And unless you have the caffeine tolerance of my dad you should not drink one right before bed in an effort to cool down. That would be an acceptable time to drink some of the aforementioned limoncello.
A frappe is a cold shaken instant coffee drink that you will hate to love. I've been thinking about them a lot lately because 1. it's hot outside, and 2. our 1st wedding anniversary was this past Sunday and we went to Athens, Greece for our honeymoon and drank lots of frappes. I wanted to recreate them for our honeymoon picnic of all Greek foods. So I did some research and did!
[and as I'm writing this a little Greek man just totally poked his head into my classroom. I swear it's true.]
Greek frappe
serves 1
Ingredients:
1 T Nescafe instant coffee
1T sugar (more or less to taste)
3-4T cold water, plus 1.5 c water
6 or so ice cubes
evaporated milk (NOT sweetened and condensed milk, oops, my bad)
Directions:
In a glass jar that has a lid (I use a canning jar, but you could use a cocktail shaker if you want) throw in the 1T Nescafe, 1T sugar, 3-4T water and 2 ice cubes. Then shake it like a polaroid picture. Seriously. It'll take almost a minute of shaking. But you will be rewarded with a jar full of delicious coffee froth. Grab a tall glass. In the bottom of the glass throw the rest of your ice cubes and some evaporated milk if you take milk in your coffee. Pour the coffee froth from the jar and into your glass. Next you need to top off the glass with some cold water. Throw a bendy straw into the glass and enjoy! (and if you're really cool and green, then you'll have some of these stainless steel bendy straws and glasses made out of recycled wine bottles!)
02 June 2010
An Obsession: Pygmy Goats
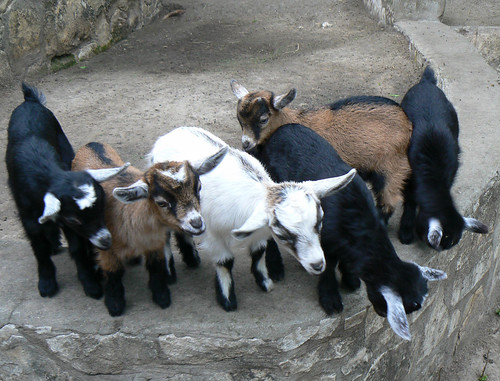
OK, you guys, one day I NEED to have pygmy goats.
Seriously. I NEED THEM. Look at them!!!!!!!!
I have been known to giggle uncontrollably and hysterically when looking at pictures of them.
True story: I did a google image search one day before I knew the power of the pygmy goat. I was hysterical for an hour just looking at the pictures. I think I only looked at 3 pictures. I couldn't stop giggling insanely. Nate got worried.

LOOK AT THEM! I need some as pets. I want to love them, and squeeze them, and hug them, and call them George.
One day. One day I will have pygmy goats to play with every day. First I need a yard.
Also, I need a sheep.
So I can shear it and spin it's wool and then make a sweater and take a picture of me and the sheep that the sweater came from.
But I can't handle doing that with a dog. This guy can:

He looks rather pleased with himself, don't you think?
Me: Hello there strange Scottish man and dog.
Strange Scottish man: Why hello there, lass.
Me: What are you doing?
SSM: Oh, just out for a hike by the loch with me pup in this fine weather we're having here.
Me: That's a mighty fine sweater you have on there.
SSM: What, this old thing? It's nothing, it's just spun from the hair of me pup here.
Me: Wow. You just said that. And you kept a straight face.
Also, why is he Scottish?
And why is it OK to me to take a picture with the sheep the wool came from but not OK to take a picture with the dog the wool came from?
That's probably because it creeps me out that this man saved THAT MUCH DOG HAIR. Seriously, that's a good sized sweater. That takes a fair amount of dog hair to spin into that amount of yarn.
I wonder if the dog likes it when he wears the sweater? He smells just like the dog I bet.
Just don't ever get caught in the rain in one of these sweaters. You will lose all of your friends.
For more portraits of sweaters and their dogs: click here. Ignore the creepy body builders flickering on the page and click on "dogwool" on the left.
01 June 2010
A Productive Weekend!
This weekend was one that I've needed for a long while. 4-day weekend! I got a TON of sewing done.
I started on the Collette mini-bloomers pattern, Madeleine. It's a really cute and FREE pattern that you can download from their site.
 See? Don't you want a pair now? I made mine for my upcoming trip to the beach. I decided that I needed something cute to sleep in. And honestly I'll probably wear them over my swimsuit, also.
I made mine out of Anna Maria Horner Cotton Voile that I got from Fancy Tiger at their trunk show recently.
The pattern was really easy to follow. But sleep shorts are generally pretty easy to sew up. Same thing with sleep pants. I'm kind of OCD when it comes to sewing, so I did all french seams. It probably took me longer than it is supposed to. But whatever. I love them. I'll have pictures up by Thursday.
The other project I decided to tackle this weekend is the BurdaStyle Alison Swimsuit #BS-002.

This was my first experience sewing swimwear. It's easier than I expected, after the chastity shirt disaster. I did learn a few things along the way.
1. Thicker knit fabrics are waaaaaaaaaaaay easier to work with. I made the suit in black with a nude lining. The lining fabric is really a lot thinner than the fabric I got for the body. It was a pain to lay out flat, it was a pain to cut, it was a pain to pin, it was not too much of a pain to sew 'cause it was pinned to a thicker knit.
2. Everyone on BurdaStyle is right, the directions are CRAP for this pattern. But if you've ever made any clothes at all you should be able to figure out the construction. The way you make it doesn't matter so much as the end result. That being said, I'll have my construction notes along with pictures up by the end of the week.
3. I look HOTTTTTT in vintage styled swimwear.
4. Thicker fabric has more benefits than just being able to sew it easier. The sample suit on the model, um, just shows a bit TMI. I think this is because the suit is made from thinner fabric and not lined at all. I'd like to not show off the shape of my privates to the whole world (and all of my family at the wedding). So I opted for thicker fabric and to line the body of the suit. Turns out, this was a GREAT idea! The suit accentuates the positives and smooths out just about all the lumps. I feel great and confident wearing this suit.
5. Look at all the pictures, repeatedly. That's really the only way I was able to figure out some of the construction.
6. If you want the back to tie, YOU HAVE TO MAKE THE TIES LONGER YOURSELF. It's not in the pattern. I didn't realize this. I just went about my happy way cutting the fabric. Then I read the instructions. They tell you to make the back ties longer if you want them to tie. But it's not until THE LAST STEP. So, before you cut anything out, read the instructions to the end. I didn't. But I did have way too much fabric.
7. In spite of everything, I'd totally make this suit again. And it'd be easier. Maybe in red? Or turquoise?
I started on the Collette mini-bloomers pattern, Madeleine. It's a really cute and FREE pattern that you can download from their site.
See? Don't you want a pair now? I made mine for my upcoming trip to the beach. I decided that I needed something cute to sleep in. And honestly I'll probably wear them over my swimsuit, also.I made mine out of Anna Maria Horner Cotton Voile that I got from Fancy Tiger at their trunk show recently.
The pattern was really easy to follow. But sleep shorts are generally pretty easy to sew up. Same thing with sleep pants. I'm kind of OCD when it comes to sewing, so I did all french seams. It probably took me longer than it is supposed to. But whatever. I love them. I'll have pictures up by Thursday.
The other project I decided to tackle this weekend is the BurdaStyle Alison Swimsuit #BS-002.
This was my first experience sewing swimwear. It's easier than I expected, after the chastity shirt disaster. I did learn a few things along the way.
1. Thicker knit fabrics are waaaaaaaaaaaay easier to work with. I made the suit in black with a nude lining. The lining fabric is really a lot thinner than the fabric I got for the body. It was a pain to lay out flat, it was a pain to cut, it was a pain to pin, it was not too much of a pain to sew 'cause it was pinned to a thicker knit.
2. Everyone on BurdaStyle is right, the directions are CRAP for this pattern. But if you've ever made any clothes at all you should be able to figure out the construction. The way you make it doesn't matter so much as the end result. That being said, I'll have my construction notes along with pictures up by the end of the week.
3. I look HOTTTTTT in vintage styled swimwear.
4. Thicker fabric has more benefits than just being able to sew it easier. The sample suit on the model, um, just shows a bit TMI. I think this is because the suit is made from thinner fabric and not lined at all. I'd like to not show off the shape of my privates to the whole world (and all of my family at the wedding). So I opted for thicker fabric and to line the body of the suit. Turns out, this was a GREAT idea! The suit accentuates the positives and smooths out just about all the lumps. I feel great and confident wearing this suit.
5. Look at all the pictures, repeatedly. That's really the only way I was able to figure out some of the construction.
6. If you want the back to tie, YOU HAVE TO MAKE THE TIES LONGER YOURSELF. It's not in the pattern. I didn't realize this. I just went about my happy way cutting the fabric. Then I read the instructions. They tell you to make the back ties longer if you want them to tie. But it's not until THE LAST STEP. So, before you cut anything out, read the instructions to the end. I didn't. But I did have way too much fabric.
7. In spite of everything, I'd totally make this suit again. And it'd be easier. Maybe in red? Or turquoise?
27 May 2010
Sorrel & Cilantro Pesto
 Photo is a wikimedia commons cc licensed photo. http://en.wikipedia.org/wiki/Sorrel
Our front yard garden is going great. We're all anxiously awaiting our first major harvest. In the meantime, we've been snipping at the greens that are growing in our cold frames. Yes, it's still cold at night here in Colorado. [sigh]
One of my new favorite things to eat is sorrel. If you've never eaten it, be prepared. It is the most intense lemon flavor I've ever had when not eating a lemon. But it's so so so good! The flavor is bright and springy. And we need more spring.
The other day we decided to make a cilantro and sorrel pesto. It was awesome. It will make your mouth sing. It also goes good with just about everything. Angel hair pasta would be awesome with this pesto. It also goes great atop fish tacos I'm told. Essentially, add this to anything you want to brighten up.
Sorrel & Cilantro Pesto
This recipe, like so many of mine, is something I just threw together. Its more like a guideline.
1/2 - 1 bunch of cilantro
1/2 - 1 bunch of sorrel (we probably used about 1/2 a cup loosely packed)
olive oil
coriander seeds
salt & pepper to taste
Put all ingredients into your blender except for the olive oil, slat & pepper. Turn the blender on and drizzle a few tablespoons in while the blades are going. Stop and scrape down the sides and test the consistency. It'll look like regular pesto does when it's ready, maybe a bit runnier because there is no nuts or cheese in this recipe. Give it a taste and adjust the salt and pepper to your liking. Proceed to eat it on everything. It would be great on bruschetta, also. Just toast some crusty bread with a bit of olive oil brushed on top. Add some yummy cheese and top with pesto.
Enjoy!
26 May 2010
Planning & Sewing
If you haven't heard yet, Collette Patterns is having an Almost Summer 30% off sale. You just have to sign up for their newsletter to get the coupon code.
I'm in love with a lot of their patterns. They have a vintage vibe that is really awesome. I like the fact that the patterns are so well designed that they look good on a wide range of body-types. That is the mark of a great designer in my opinion. Check out the gallery to see what I'm talking about.
I got my coupon code and promptly placed an order. Now I just have to decide which one to make first. And in what fabric.
Well, I know already what I'm making first. I first fell in love with Rooibos. Just check out those details. Pockets! Piping! Cute neckline! I'm in love. Now I just have to figure out what fabric to make this out of. I hate synthetics, so those are out. Cotton? Silk? Wool? I'm thinking my first one will be cotton since it's summer. Although, the Parfait pattern is also on it's way and that's a mighty fine sun dress. I think I want to make that one out of a gingham or a seersucker. I may even make that one first so that I can wear it when I go to the beach for my sister's wedding.
I've set a goal for myself: I'm going to be in FL for 3 days, I want to have handmade clothes to wear for each day. I've already got one dress. Now I need 2 more dresses or at least a dress and a shirt. Maybe a bathing suit?? I think that's pushing it a little too far. A girl can dream, can't she?
I think though that the mini-bloomers that come as a free pdf pattern on Collette's site are a necessity for sleepwear or at least as a swimsuit cover-up.
I have too many things I want to make.
25 May 2010
A Ravelry Revelation
I've been a member of Ravelry for a while now. But only recently have I really really gotten into it. It's a serious problem. Is there a Ravelrers Anonymous that I can join? 'Cause it's getting out of hand. I have a tab always open with it. I love looking at all of the cool things that people do to make the patterns their own. I love seeing the pattern adjustments and all of the different yarns. It's a time drain though.
But, I think it's also a major encouragement. There are so many awesome projects and patterns on there that I want to knit. I never knew I wanted to knit a shawl until two weeks ago. I thought shawls were old and fuddy duddy. But I'm knitting a shawl now.

In peacock blue malabrigo sock yarn nonetheless. It's going really well, too. I love the pattern, I love the yarn, I love how the yarn knits up. I'm addicted.
The pattern that I'm knitting is called Simple Things. You can find it's Ravelry page here.
I've made significant progress considering how busy my life has been lately. I'm pretty proud of how much I've actually gotten done!

Isn't that yarn gorgeous?!? The eyelets in the middle are so fun. I'm smitten. If you're related to me, what color do you want for Christmas? ;)
Also, knitted and felted shoes. Yes. Yes, please. I can't wait to get the yarn for this pattern. I'm thinking that I can sew on some leather or maybe a jute/hemp sole and then wear them outside. It'll feed into my obsession with making my own shoes.
But, I think it's also a major encouragement. There are so many awesome projects and patterns on there that I want to knit. I never knew I wanted to knit a shawl until two weeks ago. I thought shawls were old and fuddy duddy. But I'm knitting a shawl now.
In peacock blue malabrigo sock yarn nonetheless. It's going really well, too. I love the pattern, I love the yarn, I love how the yarn knits up. I'm addicted.
The pattern that I'm knitting is called Simple Things. You can find it's Ravelry page here.
I've made significant progress considering how busy my life has been lately. I'm pretty proud of how much I've actually gotten done!
Isn't that yarn gorgeous?!? The eyelets in the middle are so fun. I'm smitten. If you're related to me, what color do you want for Christmas? ;)
Also, knitted and felted shoes. Yes. Yes, please. I can't wait to get the yarn for this pattern. I'm thinking that I can sew on some leather or maybe a jute/hemp sole and then wear them outside. It'll feed into my obsession with making my own shoes.
24 May 2010
An Update

I've been trying my best to get over my sewing block. I have this fear that I'm going to mess up all the amazing fabric that I have. I'm paralyzed. I can't cut into my fabric. It's gorgeous Anna Maria Horner cotton voile. I need to make some awesome things for my summer wardrobe. I'm trying to make the Cabo Halter by Amy Butler.

This is the fabric that I want to make it out of. Pistachio-green and Robins Egg-blue cotton voile. I made a muslin, but there wasn't room for the zipper. So I redrew the pattern and added room for the zipper and I pulled the center front up about an inch. It was waaaaaay too boob-alicious as the pattern was originally drawn. Some cleavage is all well and good, but I don't want to show mine off to the whole world. No thank you. Especially since I teach high school. I was hoping to wear this under a cardigan to work. We'll see. It may be something only for summer and not work. I think I'm also going to alter the pattern a bit more so that I can have the halter straps attached to the back so that I don't have to tie it all the time. That usually makes my neck hurt. I've made a muslin from the altered pattern already. I just need to work on the straps.
Next up, my recent knitting adventures...
23 April 2010
Thyme Pickled Mushrooms: April Can Jam Challenge: Herbs
I'll just get this out of the way: I fell off the wagon last month. I was frustrated with my tiny kitchen that makes everything an ordeal. I was frustrated with the lack of anything local to can since this challenge started. So I messed up. I didn't can anything. I bought some beautiful onions and I had no inspiration. I'm sorry.
But!
I think I've come through this time with an amazing recipe.
Thyme Pickled Mushrooms
Ingredients:

2lbs locally grown white button mushroom
A large bunch of locally grown thyme
3 lemons
2-3T green peppercorns
3T kosher salt
white vinegar
water
So, I realized the other week that pickled mushrooms are very likely to be delicious. And I knew that I'd be able to get some local herbs for sure this month. And local mushrooms. There are a couple of people that grow them year round here. So I thought about my favorite herbs. Well, my favorite one by far happens to be thyme. And thyme goes great with mushrooms. And lemon.
There's this amazing mushroom-leek phyllo pastry that I make every Thanksgiving from the Moosewood Celebrates cookbook. The flavor is awesome. The ingredients: mushrooms, leeks, thyme, lemon, sherry, and tofu. I wanted to sort of translate the mushroom-thyme-lemony goodness into pickled mushrooms.
So I started to research how to pickle mushrooms. Except several of the recipes had you boil the mushrooms, then pour olive oil over them and then water bath process them. That doesn't sound all that excellent to me. The oil scares me specifically. I've got a pressure cooker for those kinds of things. The one thing that the recipes all had in common was to boil the mushrooms first.
So I figured that's what I'd do. Only, I want to cook the mushrooms in something flavorful so that they get completely infused with the thyme. So I made a pickle brine to cook the mushrooms in. Here's what I did:
First, cut the mushrooms into quarters. most recipes tell you to cut off most of the stem. I didn't. I don't mind eating mushrooms stems.
Then I made a thyme pickle brine as follows.

In a large pot mix together the following:
3 cups white vinegar
3 cups water
1 1/2 T kosher salt
1 t green peppercorns
1 lemon cut into 8ths
and a huge handful of thyme, don't worry about the stems, just throw it all in there
oh, and a piece of a dried hot red pepper

Bring the brine to a boil and add the quartered mushrooms. Cook for about 20-30 minutes until the mushrooms are reduced in size.

Next, I poured the mushrooms off into a colander and mixed up another batch of brine identical to the first batch.
Into each jar I put an eighth of a lemon and a generous handful of thyme along with a couple of green peppercorns. Then, I shoved as many mushrooms into the jar as I could. Go ahead and pack them in there tightly.
Then pour the boiling brine into the jar leaving 1/2" of headroom. Poke out all the air bubbles. The mushrooms are really good at catching air as the brine gets poured in.

Wipe the rims clean, put on the jar lids and bands and process for 20 minutes in a water bath. I went for 30 minutes 'cause of the altitude. I probably should have only gone 25 minutes, but I like to be on the safe side.
I think that these will be like most pickles, the longer you wait to crack a jar open, the better the flavor will be. Give it a month, then crack these babies open.
But!
I think I've come through this time with an amazing recipe.
Thyme Pickled Mushrooms
Ingredients:
2lbs locally grown white button mushroom
A large bunch of locally grown thyme
3 lemons
2-3T green peppercorns
3T kosher salt
white vinegar
water
So, I realized the other week that pickled mushrooms are very likely to be delicious. And I knew that I'd be able to get some local herbs for sure this month. And local mushrooms. There are a couple of people that grow them year round here. So I thought about my favorite herbs. Well, my favorite one by far happens to be thyme. And thyme goes great with mushrooms. And lemon.
There's this amazing mushroom-leek phyllo pastry that I make every Thanksgiving from the Moosewood Celebrates cookbook. The flavor is awesome. The ingredients: mushrooms, leeks, thyme, lemon, sherry, and tofu. I wanted to sort of translate the mushroom-thyme-lemony goodness into pickled mushrooms.
So I started to research how to pickle mushrooms. Except several of the recipes had you boil the mushrooms, then pour olive oil over them and then water bath process them. That doesn't sound all that excellent to me. The oil scares me specifically. I've got a pressure cooker for those kinds of things. The one thing that the recipes all had in common was to boil the mushrooms first.
So I figured that's what I'd do. Only, I want to cook the mushrooms in something flavorful so that they get completely infused with the thyme. So I made a pickle brine to cook the mushrooms in. Here's what I did:
First, cut the mushrooms into quarters. most recipes tell you to cut off most of the stem. I didn't. I don't mind eating mushrooms stems.
Then I made a thyme pickle brine as follows.
In a large pot mix together the following:
3 cups white vinegar
3 cups water
1 1/2 T kosher salt
1 t green peppercorns
1 lemon cut into 8ths
and a huge handful of thyme, don't worry about the stems, just throw it all in there
oh, and a piece of a dried hot red pepper
Bring the brine to a boil and add the quartered mushrooms. Cook for about 20-30 minutes until the mushrooms are reduced in size.
Next, I poured the mushrooms off into a colander and mixed up another batch of brine identical to the first batch.
Into each jar I put an eighth of a lemon and a generous handful of thyme along with a couple of green peppercorns. Then, I shoved as many mushrooms into the jar as I could. Go ahead and pack them in there tightly.
Then pour the boiling brine into the jar leaving 1/2" of headroom. Poke out all the air bubbles. The mushrooms are really good at catching air as the brine gets poured in.
Wipe the rims clean, put on the jar lids and bands and process for 20 minutes in a water bath. I went for 30 minutes 'cause of the altitude. I probably should have only gone 25 minutes, but I like to be on the safe side.
I think that these will be like most pickles, the longer you wait to crack a jar open, the better the flavor will be. Give it a month, then crack these babies open.
19 April 2010
[sigh]
My camera is dying. It was a major award. And now the shutter keeps freezing shut so that it only takes black pictures. I found a suggestion on how to reset the shutter. But I have to reset it now for every single picture I take. [sigh] I can't afford a new camera right now, hence the picture-less posts. My camera phone takes decent pictures, so that will be all I can do at the moment. Buh.
MOM. I just realized its your fault! YOU named it the major award. WHAT HAPPENS TO THE MAJOR AWARD AT THE END?!?!?! It gets broken, that's what.
Also, what movie has a MAJOR AWARD in it? You each get 3 guesses. Go!
MOM. I just realized its your fault! YOU named it the major award. WHAT HAPPENS TO THE MAJOR AWARD AT THE END?!?!?! It gets broken, that's what.
Also, what movie has a MAJOR AWARD in it? You each get 3 guesses. Go!
Some thoughts
I was reminded of a semi-past-time of mine today. I like to look at things in the grocery store and think to myself "before we had grocery stores, someone had to make that. If someone made that, I can make that. What would it be like to make ________?" This may get me in trouble some day. But, so far, so good. I figured it'd be fun to make a list of the things that I either can make or do make on a regular basis that is usually bought at the store in the state that you use it.
So, here goes, things I now make that I used to only buy at the store:
bread
yogurt
butter
pickles (seriously, I'll pickle anything)
jams and fruit butters
pasta
soy milk
tofu
seitan
cakes and pies
underwear
bras
skirts
winter coat
scarf
socks
pants
all-purpose cleaner
tub and tile cleaner
toilet cleaner
face cleaner
toothpaste/soap
deodorant
face oil
toner
face mask
lotion
lip balm
tinctures
duvet cover
pillow cases
mouthwash
sweater
donuts
yarn (I LEARNED HOW TO SPIN!!!! When I get my first skein done and my first project knitted, you'll be hearing ALL about it.)
ice cream
kombucha
beer
hard apple cider
And now with my next list, things I've not made yet that are on my list to learn to make SOON:
bagels - and with Joy's success I'm not so intimidated!
cheese - I went to a cheese making class this year and the guy messed up mozzarella!
dresses - OK, so I've made a few dresses, but that was a long time ago and I've got a few on the drawing board and I can't get over my fear of them right now. I want so bad to make this really cute dress I have in my head but I'm terrified that I'll mess up the dress and ruin the awesome fabric.
crackers - I <3 crackers. I don't like them having all kinds of crap in them. So, I should make them.
SHOES - this is the biggest one for me right now. I want so bad to learn how to make shoes. Just check this guy out on YouTube. The shoes he makes are amazing. I've watched every. single. video. He teaches shoemaking, too. You can apprentice with him also. I want to apprentice to a master shoemaker. I want to make my own shoes so bad. I also want to make custom lasts that exactly match my feet. Do you think that if I watch these videos enough times all of his knowledge will be imparted to me and that I'll be able to make shoes? 'Cause I don't think I can afford the apprenticeship fee. [sigh] Just think about it for a while. Making shoes is something that very few people know how to do. I can already make almost all of my other clothes. If I could make my own shoes I'd be set. I could have days where I wear only clothes that I have made myself. All the way down to, well, my shoes and socks. I know, I'm a dork. And a nerd. But not a dweeb.
knickers - not underwear, the pants that button below the knee and are made of tweed. I really want to ride my bike in knickers this summer. yes, it'll be hot. no, I don't care. I'll be hot in anything this summer.
t-shirts - oh man oh man, my last attempt at sewing jersey was the worst disaster I can imagine. Boatneck shirts don't have a neckline that hits below your boobs. Just sayin'. 'Cause mine totally did.
jeans - if I can figure out how to make jeans that fit me awesomely I'll never have a bad shopping day again. Also, the less I go shopping the happier I am. Stores stress me out.
I think that's about it for now, I'm sure there are more things I'll think of later...
05 April 2010
An Herbal First Aid Kit
I've been studying herbal medicine lately and I'm planning an herbal first-aid kit. My thoughts are that I could also sell the kit at the Farmer's Markets and on etsy and such.
Would you be interested in an herbal first aid kit?
Here are some of the things I'm thinking of including:
an all-purpose healing salve
a sore muscle salve
tinctures for headaches
a styptic powder or tincture
bandages
anti-sting poultice herbs
and some other things as I come up with them. Maybe a general women's health tonic tincture, or an allergy tincture?
And they'd all be packaged in a nice portable first aid kit box or bag. Not decided yet.
Disappointment, Discouragement, and Procrastination
Sorry, I've been out of sorts lately. I've been kind of depressed because my arm has taken so long to heal. BUT! I can ride my bike now. And do yoga. So things are looking up. [no mountain biking, bouldering, skiing, or snowboarding for another 2 months]
I've also been slacking on the Can Jam challenges. I've been really disappointed with the choices of items to can. NOTHING has been local and in season for me. Until alliums. And local food is kind of my thing now. I don't really want to can things that aren't local and in season. But, I picked up some gorgeous onions from one of my favorite farms, Kiowa Valley. And they sat. I had no inspiration. I should have used my cara-cara orange-red onion-coriander chutney from the citrus month of the can jam. But I forgot. I wanted to pickle the onions, but my kitchen was a mess and I had no energy to get my kitchen in canning order. So, better late than never I guess. Later I'll put my recipe up.
Hopefully I can do better this month with HERBS. I think I can put my hands on some fresh basil at the next farmer's market. And Whole Foods sells locally grown organic herbs if I can't make it to the market.
And I've been sewing a lot more lately. Some projects have been better than others.
I got all 3 of the built by Wendy books and Cal Patch's pattern making book also.
And, I got a bra pattern.

This bra came out awesome. But, it's the wrong size. And the underwires are the wrong size. So I have to order some new underwires and try again. But the good thing is that it was EASY. I mean seriously easy. I made this in about an hour, maybe an hour and a half. I was stoked.
Then I decided to make the boatneck t-shirt from The Home Stretch built by Wendy book. Well, I think I want a serger. 'Cause my shirt was a complete disaster! Take a look:

I think my face says it all.
From the back:

Yeah, the front is about 6 inches longer than the back. And that is so not a boatneck t. Wow I messed that one all up.
That mess-up kind of put me in a creative funk. I was all bummed 'cause I had this idea of how awesome the shirt was going to be. A majorly soft purple-y colored boatneck t with golden yellow top stitching and little tiny yellow buttons on the shoulder. Man it would have been awesome. I would be wearing it right now. And every single day.
Instead, I got what Nate now calls my "chastity shirt." It's THAT ugly. It's that major of a setback, creatively.
Then, I busted out Cal Patch's Patternmaking book [awesome, btw]. This book is my new clothes sewing bible I think. She doesn't include patterns, instead she walks you through measuring yourself and drafting the pattern. Then you make a muslin and make any necessary adjustments. So I did the first project, an A-line skirt with a side zipper and patch pockets. I got some wonderfully spring-y green stripe-y fabric. And I made a skirt. AND IT IS AWESOME AND I WANT TO WEAR IT EVERY DAY! Sorry, I got a bit happy there. Finally. After a bunch of let downs, I made something successful.

Not the best shot, but you get the idea. It's so cute. The muslin fit. But when I made the skirt, it did NOT fit right. So I put a fake flat-felled seam in the middle of the front and the back and that took about 2 inches out of the skirt and then it fit awesomely. I'm still getting the hang of this tailoring thing.
Then this weekend. I figure I had so much success with my spring skirt, I should make it out of some denim I had on hand. Thing is, it's stretchy denim. And my track record with stretchy is about 50% success. And yep, you guessed it. I totally botched the skirt. When I sewed the waist, I totally ended up stretching it all out of whack. So the thing totally doesn't fit. I guess the good news is that I'm totally awesome at putting in zippers! And I totally suck at anything stretchy. I keep pulling it all out of whack.
I tried making my own underwear. The first pair turned out all wanky. I forgot that you are supposed to stretch the elastic when you sew it on. So they didn't fit at all. Then I sewed another pair and I think I over stretched the elastic. They fit, and they fit well, so I consider them a success. But I'm not showing you a picture of me in my underwear. I have some sense of decency. The only problem stretching the elastic too much makes is that they ball up when they are not on.
So, hopefully I can get out of this creative funk. I think it's always good to own up to your mess ups. I do a lot of stuff well. But that doesn't mean I've always done that stuff well. I've had my fair share of messed up projects. But I usually don't have this many at once. That's been rough for me.
So, here's my personal challenge/goal: I want to make my own clothes. All of them. Seriously. I should be able to do that I think.
...I've just got to get the hang of sewing with knits. Any suggestions?
I've tried using the walking foot, but I don't think I'm doing it right, it still stretches all weird.
I've also been slacking on the Can Jam challenges. I've been really disappointed with the choices of items to can. NOTHING has been local and in season for me. Until alliums. And local food is kind of my thing now. I don't really want to can things that aren't local and in season. But, I picked up some gorgeous onions from one of my favorite farms, Kiowa Valley. And they sat. I had no inspiration. I should have used my cara-cara orange-red onion-coriander chutney from the citrus month of the can jam. But I forgot. I wanted to pickle the onions, but my kitchen was a mess and I had no energy to get my kitchen in canning order. So, better late than never I guess. Later I'll put my recipe up.
Hopefully I can do better this month with HERBS. I think I can put my hands on some fresh basil at the next farmer's market. And Whole Foods sells locally grown organic herbs if I can't make it to the market.
And I've been sewing a lot more lately. Some projects have been better than others.
I got all 3 of the built by Wendy books and Cal Patch's pattern making book also.
And, I got a bra pattern.
This bra came out awesome. But, it's the wrong size. And the underwires are the wrong size. So I have to order some new underwires and try again. But the good thing is that it was EASY. I mean seriously easy. I made this in about an hour, maybe an hour and a half. I was stoked.
Then I decided to make the boatneck t-shirt from The Home Stretch built by Wendy book. Well, I think I want a serger. 'Cause my shirt was a complete disaster! Take a look:
I think my face says it all.
From the back:
Yeah, the front is about 6 inches longer than the back. And that is so not a boatneck t. Wow I messed that one all up.
That mess-up kind of put me in a creative funk. I was all bummed 'cause I had this idea of how awesome the shirt was going to be. A majorly soft purple-y colored boatneck t with golden yellow top stitching and little tiny yellow buttons on the shoulder. Man it would have been awesome. I would be wearing it right now. And every single day.
Instead, I got what Nate now calls my "chastity shirt." It's THAT ugly. It's that major of a setback, creatively.
Then, I busted out Cal Patch's Patternmaking book [awesome, btw]. This book is my new clothes sewing bible I think. She doesn't include patterns, instead she walks you through measuring yourself and drafting the pattern. Then you make a muslin and make any necessary adjustments. So I did the first project, an A-line skirt with a side zipper and patch pockets. I got some wonderfully spring-y green stripe-y fabric. And I made a skirt. AND IT IS AWESOME AND I WANT TO WEAR IT EVERY DAY! Sorry, I got a bit happy there. Finally. After a bunch of let downs, I made something successful.
Not the best shot, but you get the idea. It's so cute. The muslin fit. But when I made the skirt, it did NOT fit right. So I put a fake flat-felled seam in the middle of the front and the back and that took about 2 inches out of the skirt and then it fit awesomely. I'm still getting the hang of this tailoring thing.
Then this weekend. I figure I had so much success with my spring skirt, I should make it out of some denim I had on hand. Thing is, it's stretchy denim. And my track record with stretchy is about 50% success. And yep, you guessed it. I totally botched the skirt. When I sewed the waist, I totally ended up stretching it all out of whack. So the thing totally doesn't fit. I guess the good news is that I'm totally awesome at putting in zippers! And I totally suck at anything stretchy. I keep pulling it all out of whack.
I tried making my own underwear. The first pair turned out all wanky. I forgot that you are supposed to stretch the elastic when you sew it on. So they didn't fit at all. Then I sewed another pair and I think I over stretched the elastic. They fit, and they fit well, so I consider them a success. But I'm not showing you a picture of me in my underwear. I have some sense of decency. The only problem stretching the elastic too much makes is that they ball up when they are not on.
So, hopefully I can get out of this creative funk. I think it's always good to own up to your mess ups. I do a lot of stuff well. But that doesn't mean I've always done that stuff well. I've had my fair share of messed up projects. But I usually don't have this many at once. That's been rough for me.
So, here's my personal challenge/goal: I want to make my own clothes. All of them. Seriously. I should be able to do that I think.
...I've just got to get the hang of sewing with knits. Any suggestions?
I've tried using the walking foot, but I don't think I'm doing it right, it still stretches all weird.
21 February 2010

This was my snack/late lunch today.
These sort of came about by accident. We needed milk for our coffee so I bundled up and walked over to Marczyk's. I picked up cream-top milk, heavy cream, house made mozzarella (I've not purchased rennet yet to make my own), and 2 oranges because Nate had mentioned both wanting some citrus and more fruit in his diet.
When I got home I decided that scones would be awesome to make.
WHY?!?! I never eat scones. I'm not partial to them in the least bit. In fact most of the ones I've had turn me off. Chalky and dry are not words you ever want to use to describe food.
I have this large jar of local organic flour. If you know me at all then you probably know how happy that makes me and how long I've been searching out locally grown and milled flour (and how inconceivably hard it is to find!).

I've also got this large jar of raw local honey. This stuff is delicious. I wanted to put the two together for some sort of super local baking extravaganza.

And for some reason scones popped into my head. So I went a-recipe-diggin. Which usually consists of me googling several of my favorite cooking blogs. Which is exactly how I stumbled across this recipe.
And of course she got the recipe from America's Test Kitchen.
So here's my recipe run down. I made a few changes from the recipe.
2c local organic unbleached flour
1T baking powder
3T local raw honey (I got mine from Lee's Bees)
3/4 t flaky sea salt (I pulled out the fancy stuff for this, fleur de sel de guerande)
5T chilled, unsalted butter (if you've only got salted, leave out the salt above)
zest from 2 oranges
1c heavy cream (mine was from Morningfresh dairy, it's so thick I swear it's already whipped cream)
First I turned the oven on to 425F.
Then I mixed all of the dry ingredients in a large mixing bowl.
First the flour.

Then the baking soda.

And the salt.
Then I zested the oranges.

But I decided that the orange zest shouldn't go in with the dry ingredients. Zest has a bad habit of drying out fast. So I measured out the 3 T of honey into my glass 2 c measuring cup and dumped all the zest into the honey as I was going. I think you'll get the most flavor out of your zest if you don't dry it out.
And I poured the slow as molasses heavy cream on top of the honey and then whisked it all up.
Now, it's time for one of my favorite parts. Toss in the 5T of cubed and chilled unsalted butter and grab your pastry cutter (or a knife and a fork) and cut the butter in. [side note: the pastry cutter was my all time favorite kitchen tool to play with when I was a kid. Especially if we were mixing butter and sugar or shortening and sugar. Then I would lick it clean. Gross, I know.]

Next, pour the heavy cream-honey-orange zest mixture into the dry stuff. Look at all of that yummy orange zest! Mix it up real good. Use your hands. Get all of the goodness mixed in.

Then, I dumped the dough onto my 1/4 sized sheet pan and smooshed it until it was square. I then cut it into 8 triangles.
Place the wedges on an ungreased baking sheet and bake at 425F for 12-15 minutes.

Your house will smell amazing, by the way. Try not to drool.
Also, don't do what I did. I set my timer. Then I started to smell the awesomeness and took a peek. My oven thermometer read 550F! WTF?!?! I snatched the scones out of the oven. Fortunately, I was putzing around in the kitchen and mixing up some no-knead bread dough and was there to pull them out.
But, in the end, disaster was averted. And, I got to eat this. Perfect scone, perfect cup of coffee. The scones turned out light and flaky. Not too sweet, and lightly orange flavored. Sitting in my comfy chair, drinking coffee, nibbling on a scone, and watching the snow fall out my window was the perfect way to spend my afternoon. And, these scones changed my mind about scones in general. They took me all of 20 minutes start to finish to make. Remind me why I'm not baking these several times a week so that I can eat them for breakfast every day?

I'm not sure why my oven was running so high. It's always been right on. I'll have to check things out. I really don't enjoy burning things.
20 February 2010
local lunch

I totally scored fresh local arugula this morning at the farmer's market. I was so excited. It's snowing and there's this bucket of fresh, local green stuff. AND it was only $1 a bunch. I bought 2. I may regret not having purchased more. Berry Patch Farms brought it and it sold out in about an hour.
I also scored some eggs, potatoes, and onions from Kiowa Valley, and some cheddar from Twin Mountain Milkhouse (I love their cheddar entirely too much).
For lunch today I had an entirely local meal. I made a cheddar-arugula omelette.

The ingredients:
butter from Robinson's Dairy
eggs from Kiowa Valley
arugula from Berry Patch Farms
cheddar from Twin Mountain Milkhouse

The salt and pepper were the only non local things in this meal. But really, is there salt or pepper from Colorado that can be found?
Tomorrow I'm going to experiment with 100% local baking. I've got local raw honey and local flour now. Can I bake something delicious with that? I sure hope so! I know I can at least get some delicious no-knead bread, so that there'll be no need to go to the store for sandwich bread this week.
This afternoon I'm going to attempt the boatneck t-shirt from the Build by Wendy Sew U: the Home Stretch book.
It's going to be magenta/purply colored with yellow buttons and yellow top stitching.
Finished!

[sorry about the pasty white expanse of knee and thigh you have to look at. It's still snowing here. I can see snow coming down outside my window as I type this.]
I finally finished my green alpaca leg warmers that I started like 5 years ago. I bought the yarn at a random yarn store we came across on a family ski trip in Colorado. It was seriously about 6-7 years ago. I planned on making leg warmers. I started one leg warmer. But I put the project down and forgot about if for several years. Then, I moved to Colorado. It's a lot colder here for a lot longer than it is in Tennessee. So I pulled the project back out and knocked it out. I'm in love with these leg warmers right now. So warm. So comfy. So gorgeously green.
To knit your own pair:
I used 4 skeins of alpaca yarn (I lost the tags so I don't know exactly which kind). I used size 8 double pointed needles.
Cast on 51 stitches. Divide evenly on 3 dpn and join to work in the round. Work in a 1x1 rib (k1, p1) until they are the length you desire. I knitted until these would reach from the floor to mid thigh with out putting them on. They stretch out so they won't be that long once you put them on. And I like them scrunchy so I wanted some extra length to scrunch.
Make sure you cast on and bind off loosely. You're going to have to slip these over your feet and calves. And you don't want to end up with a newly knit pair of leg warmers that you can't get on!
I ended up using almost 2 whole skeins of yarn for each leg warmer.
19 February 2010
Pickled Carrots
[and beets, and turnips, and parsnips]
I decided to pickle my carrots. But I went a bit overboard and then just dumped everything in a can and pickled it.
I used this spicy garlic dill pickle brine (from Marisa at Food in Jars).
The good thing is that they turned out amazing. Spicy, garlicky. Crunchy. Everything you could want from a pickle.
The bad thing is that we ate them all, before I remembered to take a picture. I've got more carrots that need to come to a vinegary fate. When I get those pickled I'll get a picture up.
But seriously, if you like pickles with a kick, I'd really really really recommend you try that brine from Marisa. It's my new favorite pickle brine. We also did cucumbers back in the summer with this brine. They were amazing. My absolute favorite.
And I know most people have had pickled beets. But pickled turnips are one of my new favorite pickles. The parsnips weren't bad, just not my favorite.
Also, I really liked the sweeter veggies with this spicy brine the best. I really like the contrast of sweet, spicy, vinegary.
[I'm sorry I forgot to get a picture! I'm still getting the hang of remembering to take pictures constantly.]
18 February 2010
Garden Planning
I'm so excited, I get to have a garden this year! It's not at my apartment because I clearly have no where to put a garden in a 600 square foot apartment. My friend Erica shares a house with her sister and they are putting in a vegetable garden. I get to be a part of it!
The bad thing is that I want to grow everything. I also want to eat it all, but that's a different problem. We had a garden planning meeting last night and we all want to grow everything. And can everything. And eat everything. We're a bit over the top I think.
I really want to order seeds from Seed Savers. They have some amazing looking vegetables. I want to eat them all.
Here are some of my top picks:
Romanesco. How amazingly gorgeous is this vegetable?!?!?! It's supposed to taste like the best broccoli you've ever had. I want to eat it. I want to know what it tastes like. And there's always the Fibonacci connection to geek out over. If you count all of the spirals that go in different directions you'll end up with consecutive Fibonacci numbers. Math is everywhere. Even in my food.
Tomatoes. There are over 70 varieties!!!!! How's a girl to decide? There are so many colors and shapes. And they all look delicious. Who would have known from shopping at the grocery store that there are so many different kinds to choose from?! I want to can tomato paste, ketchup, tomato sauce, and salsa this summer.
Mexican Sour Gherkins. Yep, miniature watermelon looking cucumbers. Marisa at Food in Jars had a run in with these and pickled them. I'm dying to try them.
Also, take a look at all the cucumbers at Seed Savers. I want to make pickles out of all of them. That's really the only way I actually enjoy cucumbers, but some of these may change my mind on that count.
Chiogga Beets. Gorgeous. And, I love beets.
Melons. Lots and lots of melons. I really really really want all of these actually. And don't forget the watermelons, too!
All this food is making me hungry. I can only imagine how awesome this summer is going to be when we are eating meals that we grew. Wow.
17 February 2010
It's a BOY!
My littlest sis is pregnant for the second time, and she's having a boy! I totally called it, too.
But, I'm totally enjoying MADE right now. The month of February they are focusing on boy crafts. I want to make so many things from there for my new nephew. Go check it out!
16 February 2010
New Lunch Bag
I made my own lunch bag almost 2 years ago. It was amazing and cute. The only problem was that I didn't have much foresight and made it out of white and pink fabric. Now, the inside and outside bottom panels were both made from a cute pink and white oil cloth. But the rest of the bag just got gross after 2 years of spills. I washed and washed and washed the thing. No luck.

The other day I was out at Fancy Tiger Crafts. Man, that place is dangerous. I'll take one of everything! Thanks! But I found this amazing laminated fabric. I don't know if you've seen laminated fabric, but it's what the cheap oil cloth is supposed to be. I love this stuff. I also realized that making the entire bag out of the laminated fabric should solve my stain woes. So far, it has.
I've been using the bag for about 2 weeks now. It really encourages me to pack a healthy lunch each day. I love pulling out my cute new bag and putting food in it. It just makes me happy. It's so bright and cheerful and makes me think of spring. It's just what I needed in my life right about now.

27 January 2010
A Can Jam, Part 2: Orange-Onion-Coriander Marmalade
I wish I had pictures of this over cheese. It is SO GOOD with some brie and toast or crackers. Preferably with the brie all warm and melty...
So, here we go.
After I had the blood orange marmalade bubbling away on the stove top, I started this recipe. It's one of my own devising, meaning I did just what I do for most other recipes, I found some recipes as jumping off points (proportions, safety and such) and then just went off on my own tangent.
Let's talk about onions.
For some reason, I got it into my head that I had to make something with oranges, coriander, and onions. I just knew that it'd all go really really well together.
So, I started by cutting up a red onion.
I find it's easiest to just cut the thing in half first and then to peel it. Never cut off the root!

Then, lay the halves down and slice once down the middle. Then cut the onion into 1/4 moons.

You'll end up with around 1 cup of red onion, depending on it's size.

Next, grab 6 cara-cara oranges. Don't forget, pink is the new orange!
Zest them. I seriously ended up with 1/2 c. of orange zest.

Peel them.

Next, separate the segments and cut them into thirds.

I ended up with about 2 1/2 cups of orange pieces.
Then, you want to take about 2 T of coriander seeds and crush them with a mortar and pestle or in a spice grinder. But I like pounding them. A lot.

Finally, dump the oranges, the coriander, the onion, some sugar and salt, and a bit of water all into a sauce pot. Cook until it reaches the consistency that you like. Add a shake of hot chili peppers that have been ground up. Can in a water bath.
I'll be honest, I live above 5,000 feet. I have a tendency to err on the side of over processing what I can. I think I processed this stuff for over 30 minutes. Probably a little overkill. But I want to be on the safe side.
This is just what I was hoping it would be. It's amazing served over cheese. Preferably something warm and melty and on a cracker.
I'd show you a picture, but we ate all the cheese this ended up on top of before I could get a picture.
I ended up with 3 pint jars.
So, here we go.
After I had the blood orange marmalade bubbling away on the stove top, I started this recipe. It's one of my own devising, meaning I did just what I do for most other recipes, I found some recipes as jumping off points (proportions, safety and such) and then just went off on my own tangent.
Let's talk about onions.
For some reason, I got it into my head that I had to make something with oranges, coriander, and onions. I just knew that it'd all go really really well together.
So, I started by cutting up a red onion.
I find it's easiest to just cut the thing in half first and then to peel it. Never cut off the root!
Then, lay the halves down and slice once down the middle. Then cut the onion into 1/4 moons.
You'll end up with around 1 cup of red onion, depending on it's size.
Next, grab 6 cara-cara oranges. Don't forget, pink is the new orange!
Zest them. I seriously ended up with 1/2 c. of orange zest.
Peel them.
Next, separate the segments and cut them into thirds.
I ended up with about 2 1/2 cups of orange pieces.
Then, you want to take about 2 T of coriander seeds and crush them with a mortar and pestle or in a spice grinder. But I like pounding them. A lot.
Finally, dump the oranges, the coriander, the onion, some sugar and salt, and a bit of water all into a sauce pot. Cook until it reaches the consistency that you like. Add a shake of hot chili peppers that have been ground up. Can in a water bath.
I'll be honest, I live above 5,000 feet. I have a tendency to err on the side of over processing what I can. I think I processed this stuff for over 30 minutes. Probably a little overkill. But I want to be on the safe side.
This is just what I was hoping it would be. It's amazing served over cheese. Preferably something warm and melty and on a cracker.
I'd show you a picture, but we ate all the cheese this ended up on top of before I could get a picture.
I ended up with 3 pint jars.
Can Jam Round-Up
For those that are interested, here's the January Can Jam Round-Up over at Tigress in a Jam.
20 January 2010
A Can Jam! Part 1
I spent most of Sunday getting ready and working on my projects for the Can Jam. I went a bit overboard.
Let me show you what I ended up working with.

In the front we have some lovely and tiny blood oranges. I know, they don't have the usual skin color of the blood oranges I'm used to seeing. But, when I peeled them open they were just as beautiful and you'd expect.
In the bowl in the back we have Meyer lemons (about 18 of them!) and 6 Pink Cara Cara oranges. Their stickers said "Pink is the new orange!" I'm so glad I found out now! Can you imagine how embarrassed I would be if I was still wearing orange?!?!
Just because they were so beautiful, here's another picture.

The first thing I made was some blood orange marmalade. And oh my gosh is it perfect for Nate. He's got a love of all things bitter. He's also allergic to fun, but that's another story. This marmalade is perfect to me. It starts out sweet but ends up deliciously bitter. Not at all sad bastard bitter.
Ingredients:
6 small blood oranges
1/4 c. water
3/4 c. sugar
This made almost a full 12 oz jar of marmalade. I know, 12 oz canning jar?!?! Nate got me 2 HUGE boxes of canning jars he bought from a guy at work. They ordered them from a restaurant supply company. I was wary about them 'cause they aren't from a source that I know. So, we busted out his handy dial calipers and measured the thickness of the glass and it is the same as that of my regular ball jars. So, with my, erm, wide knowledge of canning equipment I deemed these worthy. I decided to only try one jar to mitigate the damage if it cracked or blew up or what have you.
OK, enough about weird canning jars. You want to hear about the marmalade.
First things first: tie on your favorite apron. Trust me on this, it will make your day go MUCH better.

Then, we're gonna need some coffee. Or at least I am if I'm going to make it through the day.

The first thing I always do is get all of the ingredients and equipment and put them out on the counter. The last thing I want to do when I've got a giant pot of boiling water and a hot sugary mess is to have to scramble looking for something.

Um, yeah. I did decide that onions were necessary items for this. I'll tell you about that later.
Next up, grab your bowl of blood oranges and your microplane grater and zest them completely.

OK, so here's the deal. I know traditional marmalade, you peel the oranges, scrape all of the pith off, and then chop up the peels. That sounds like a LOT of work. So I took the easy way out and just zested the little buggers and used that zest in place of the peels. A lot LESS work. And that is a good thing. And I'm kind of lazy.
Next, peel all those oranges.

Aren't blood oranges gorgeous?!?!
Then we need to chop them up into bits. I just pulled the segments apart and cut them in 1/2 to 1/3rds.

I ended up with 2 cups of orange pieces.
Throw them in a pot and add the sugar.

Then I cooked it for about 45 minutes until the orange pieces broke down completely.
Not quite ready...

Ah, that's more like it!

I like my jams and marmalades to be pretty well set. If you like yours a bit runnier, please, don't cook it as long as I did.
I ended up with one 12 ounce jar of blood orange marmalade. AND these weird jars worked just fine! No explosions, no cracking. What a relief.
I'm thinking we'll probably use this for breakfasts. Either mixed into yogurt with granola, or on top of a bagel with cream cheese. Oh man that sounds good...

Stay tuned for the Meyer lemon extravaganza!
I have a problem. Every time I go to the store I want to buy more citrus to can.
Let me show you what I ended up working with.
In the front we have some lovely and tiny blood oranges. I know, they don't have the usual skin color of the blood oranges I'm used to seeing. But, when I peeled them open they were just as beautiful and you'd expect.
In the bowl in the back we have Meyer lemons (about 18 of them!) and 6 Pink Cara Cara oranges. Their stickers said "Pink is the new orange!" I'm so glad I found out now! Can you imagine how embarrassed I would be if I was still wearing orange?!?!
Just because they were so beautiful, here's another picture.
The first thing I made was some blood orange marmalade. And oh my gosh is it perfect for Nate. He's got a love of all things bitter. He's also allergic to fun, but that's another story. This marmalade is perfect to me. It starts out sweet but ends up deliciously bitter. Not at all sad bastard bitter.
Ingredients:
6 small blood oranges
1/4 c. water
3/4 c. sugar
This made almost a full 12 oz jar of marmalade. I know, 12 oz canning jar?!?! Nate got me 2 HUGE boxes of canning jars he bought from a guy at work. They ordered them from a restaurant supply company. I was wary about them 'cause they aren't from a source that I know. So, we busted out his handy dial calipers and measured the thickness of the glass and it is the same as that of my regular ball jars. So, with my, erm, wide knowledge of canning equipment I deemed these worthy. I decided to only try one jar to mitigate the damage if it cracked or blew up or what have you.
OK, enough about weird canning jars. You want to hear about the marmalade.
First things first: tie on your favorite apron. Trust me on this, it will make your day go MUCH better.
Then, we're gonna need some coffee. Or at least I am if I'm going to make it through the day.
The first thing I always do is get all of the ingredients and equipment and put them out on the counter. The last thing I want to do when I've got a giant pot of boiling water and a hot sugary mess is to have to scramble looking for something.
Um, yeah. I did decide that onions were necessary items for this. I'll tell you about that later.
Next up, grab your bowl of blood oranges and your microplane grater and zest them completely.
OK, so here's the deal. I know traditional marmalade, you peel the oranges, scrape all of the pith off, and then chop up the peels. That sounds like a LOT of work. So I took the easy way out and just zested the little buggers and used that zest in place of the peels. A lot LESS work. And that is a good thing. And I'm kind of lazy.
Next, peel all those oranges.
Aren't blood oranges gorgeous?!?!
Then we need to chop them up into bits. I just pulled the segments apart and cut them in 1/2 to 1/3rds.
I ended up with 2 cups of orange pieces.
Throw them in a pot and add the sugar.
Then I cooked it for about 45 minutes until the orange pieces broke down completely.
Not quite ready...
Ah, that's more like it!
I like my jams and marmalades to be pretty well set. If you like yours a bit runnier, please, don't cook it as long as I did.
I ended up with one 12 ounce jar of blood orange marmalade. AND these weird jars worked just fine! No explosions, no cracking. What a relief.
I'm thinking we'll probably use this for breakfasts. Either mixed into yogurt with granola, or on top of a bagel with cream cheese. Oh man that sounds good...
Stay tuned for the Meyer lemon extravaganza!
I have a problem. Every time I go to the store I want to buy more citrus to can.
Subscribe to:
Posts (Atom)


